Select your version of Photoshop

IMPORTANT NOTE
The purpose of our Training Projects is to ensure that your equipment is working correctly and you are properly following the instructions step-by-step. We inform all of our customers that following the interlacing, printing and laminating instructions is critical when working with any lenticular project. Without completing a project, we cannot help diagnose any issues that occur when creating your own lenticular prints. If you successfully complete a Training Project and problems occur with your own project, most likely your artwork is the issue.
If you have not already, we suggest purchasing the 3D Dinosaur Target Sample in our 3D & Flip Sample Pack. These samples are used as targets for you to compare your own 3D Dinosaur print after completing the project. If you can successfully replicate the 3D Dinosaur Target Sample, you can continue with your own projects with either the same or similar interlacing settings. Make sure to print with the same print settings as the 3D Dinosaur Project.
The 3D Dinosaur Project was created to teach you the basics of 3D Lenticular Printing.
If you run into any problems, feel free to contact our team at 702-897-6185.
This tutorial explains how to:
• Prepare your layers for interlacing
• Convert each layer into a 3D element
• Save and print your interlaced image
• Attach a 3D Lenticular Lens to the interlaced print
• Use a VueThru 3D Frame (no attaching required)
Up to CC2014 (New CC See *Note below)/CS6 Extended
CS5 Extended
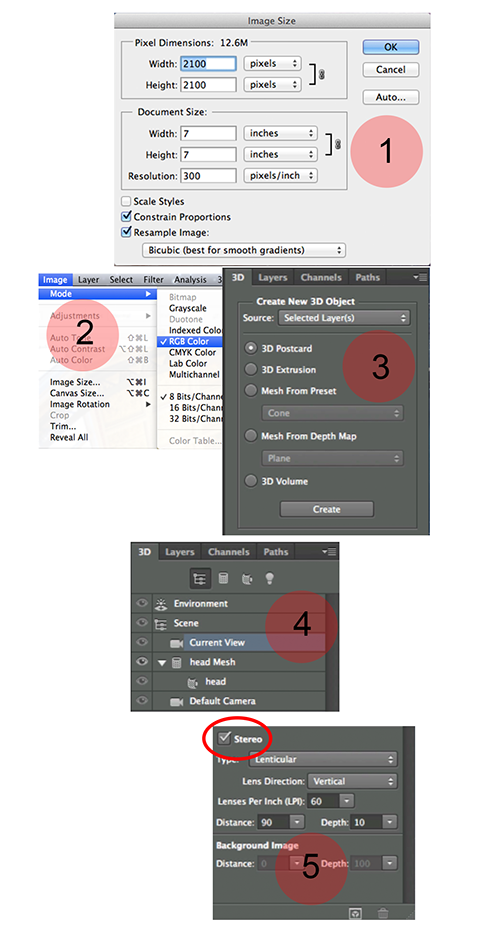
3D Dinosaur (Photoshop CC2014 / CS6) Interlacing Settings
2 Check the Image, Mode, is RGB
3 Select the 3D tab
Select the layers and click Create
4 Select your layer, click on the 3D Tab
Select Current View,
5 Select Check Box to enable Stereo rendering
In the Type pulldown select Lenticular
Lens Directions is always Vertical
LPI is always 60
(*Note - the current version of Photoshop CC is broken. Use 5 as the LPI)
Distance Depth
Head 90 10
Logo 50 5
Body -25 20
Tail -40 20
Great Hall -90 10
Open the 4x6 Test File
1 Check the Image
Image Size
Verify the size is 7x7 at 300DPI
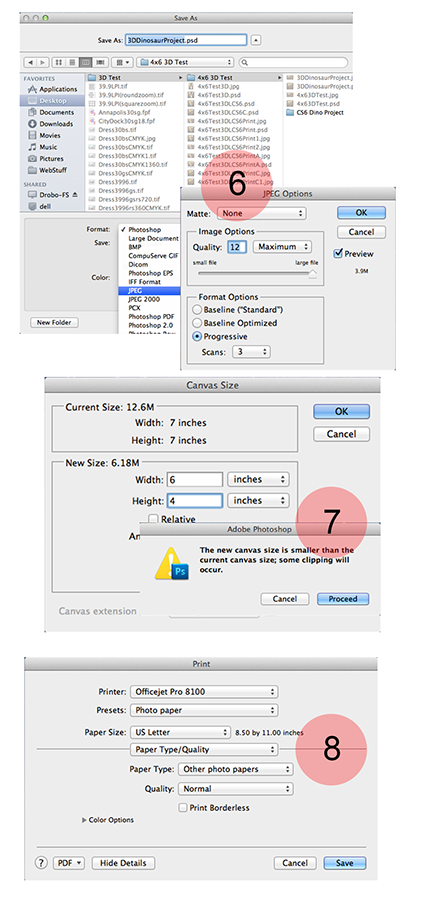
6 Go to File and Save As
Under Format select JPEG
Save Image Quality to 12, the Maximum
7 Open the JPEG file
Go to Image tab, followed by Canvas Size
Change the Width to 6 and the Height to 4
Click OK and Proceed
8 Go to File and Print
InkJet Printer Settings
Paper Type= Other Photo Paper
Quality= Normal
Borderless= No
Open the 4x6 Test File
1 Check the Image
Image Size
Verify the size is 7x7 at 300DPI
2 Check the Image, Mode, is RGB
3 Select your top layer, click on the 3D tab
followed by New 3D Postcard From Layer
4 Click on 3D tab again
followed by Render Settings
5 Enable Stereo Rendering
Change Stereo Type
to Vertical Interlaced
LPI is always 60

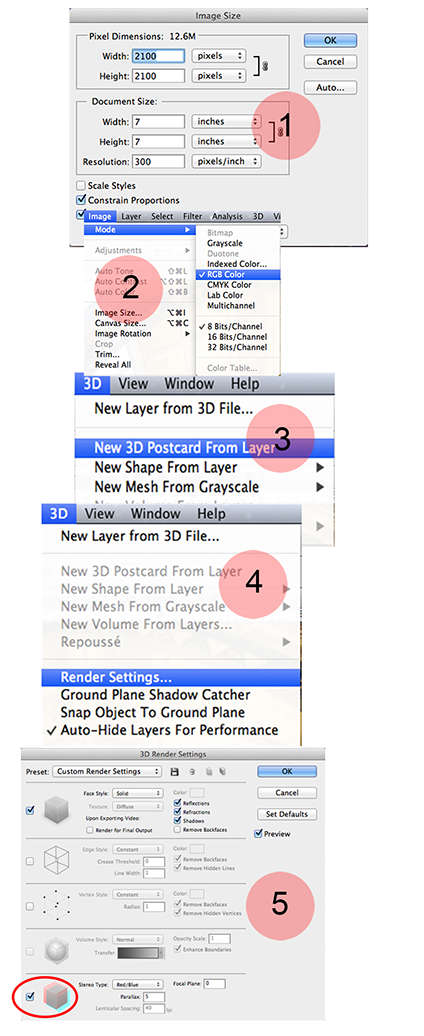
Parallax F/P
Head 90 10
Logo 50 5
Body -25 20
Tail -40 20
Great Hall -90 10
3D Dinosaur (Photoshop CS5) Interlacing Settings
7 Open the JPEG file
Go to Image tab, followed by Canvas Size
Change the Width to 6 and the Height to 4
Click OK and Proceed
8 Go to File and Print
InkJet Printer Settings
Paper Type= Other Photo Paper
Quality= Normal
Borderless= No
6 Go to File and Save As
Under Format select JPEG
Save Image Quality to 12, the Maximum
LAMINATION - Attaching Photo to Lenticular Lens
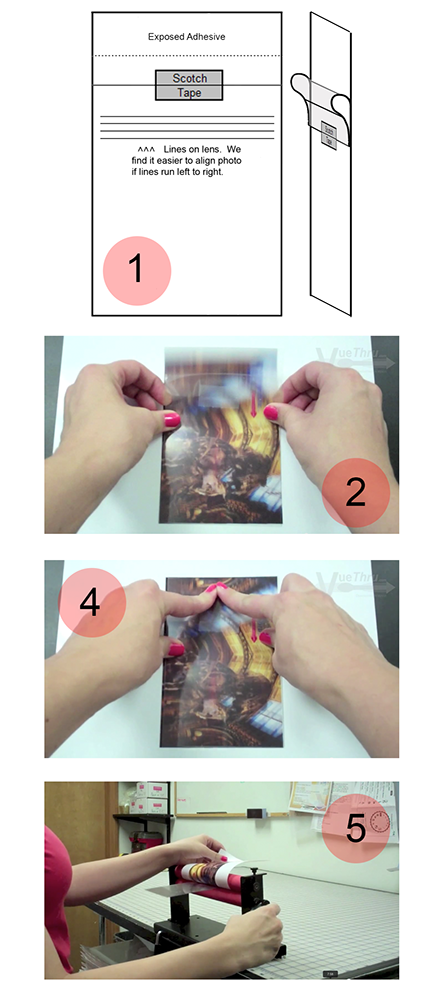
Unless specifically requested, VueThru applies an Optically Clear Adhesive on the smooth side of all lenticular lens sold. There is a clear release liner on top of the Adhesive that protects the lens. You can follow along with the Applying the Lenticular Lens section of the 3D Dinosaur video for a better visual aide. Once you have a photo ready to attach to the lens:
1. Hold the lenticular lens, lines facing down. Take a piece of tape and press down on one of the top corners of the lens. Lift the tape up to raise the clear release liner. Gently pull down the release liner to expose 1 inch of the adhesive on top of your lens. Remove the tape from the corner and attach it to the center of the release liner, creating a curl. Do not crease the release liner, the curl will keep the adhesive off the print until you are ready to attach the lens.
2. Place your photo on a flat surface about waist high. Rotate the image 90° so that the interlaced lines in the image run left to right. Place the lens, lines facing up, on top of the photo. Pinch both sides of the lens below the release liner between your thumbs and index fingers. Rotate your wrist back toward you, lifting the exposed adhesive away from the photo while pressing the bottom portion of the lens against the photo. In all 3D designs there will be an element that you can focus on that will help with proper lens alignment. With the lens on the image you should see that the element is choppy or broken. Make slight adjustments by moving the lens up and down until you see the element focus.
3. Use a rocking motion to move your body in and out over the photo to ensure the dinosaur’s head properly shifts, not diagonally or broken. Make slight adjustments as necessary.
4. Once the 3D image is aligned, keep pressure on the lens to prevent moving and release your index fingers to lay the lens flat on the photo. Starting at the middle of the lens, move your fingers up over the exposed adhesive and press the adhesive to the photo.
5. Turn the photo face down and insert the attached edge into the laminator. Lift the bottom of the photo (where it is not attached to the lens) and reach in to remove the clear release liner. Roll the photo and lens through the laminator, while holding the photo off the adhesive until the photo is pulled through.
VueThru provides a 3D frame that attaches the lenticular lens to an interlaced photo without the need of an adhesive. There is a clear silicon band placed over the top portion of the frame to help hold the lens shut and an easel stand on the back. Once you have a photo to insert:
LAMINATION - Using the VueThru 3D Frame
1. Trim the photo to the size of the frame, making your first trim on the bottom of the image. Make sure your first cut is as straight as possible to help with proper lens alignment. Then, finish trimming off the remaining sides.
2. Grab your VueThru 3D Frame and remove the silicon band located on the top portion of the frame. If a sample photo is provided, remove the image from the frame and replace it with your own.
3. Move the image around and/or tap on the edges of the frame to align the photo with the 3D lenticular lens, making slight adjustments as necessary.
4. Once the image is aligned with the lenticular lens, reattach the silicon band.
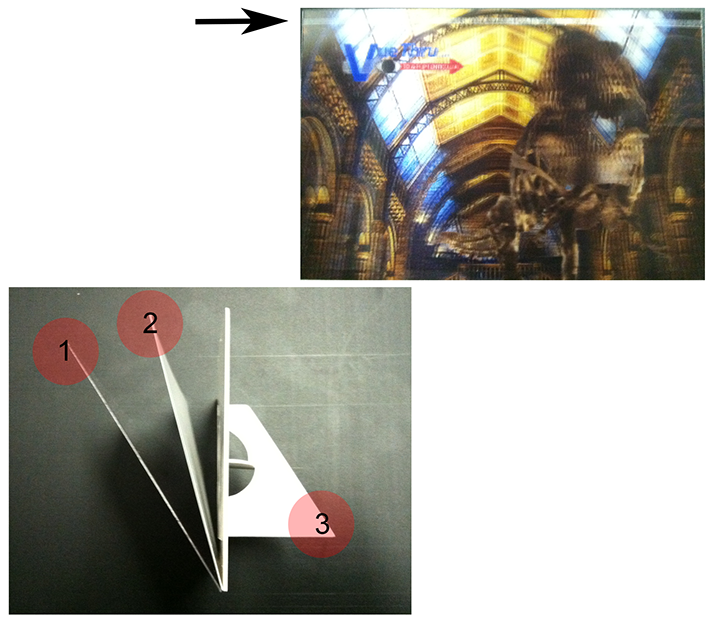
1. Lenticular Lens
2. Interlaced Photo
3. Easle Stand
Silicon Band
© VueThru, Inc. All Rights Reserved. p: 01-702-897-6185 f: 01-702-987-1569